Adding Custom Widgets
Custom Widgets share the same underlying framework used by Built-in Analysis Widgets.
A Custom Widget has to derive from the WidgetBase
base class and implement certain handlers as described here.
Widget Registration
A Widget class must have a unique name class attibute to be registered.
class CustomWidget(WidgetBase)
    name = "Custom Widget"
An error is raised when the name class attribute is missing or if it exists but
is the same as an already registered widget. The uniqueness of the name exists to
prevent accidental overwrite of existing Widget classes. During testing or for use in
Notebooks, an option is provided to force re-registraion of a Widget class if a
_override_name class attribute set to True exists in the class defintion.
In the example below, the CustomWidget class overrides the built-in
AbsoluteTemperature widget because it uses
the same name “Absolute Temperature”.
class CustomWidget(WidgetBase)
    name = "Absolute Temperature"
    _override_name = True
This also enables customization of Built-in Analysis Widgets by cloning them in Notebooks and modifying them as needed.
An optional description class attribute can be used to specify more details about the
Widget and this gets displayed along with the name in the list of available Widgets in
the dashboard UI.
Run frequency and Run mode
The WidgetBase base class specifies two attributes
for all Widgets (defaults shown below):
_run_frequency = "every-frame"
_run_mode = "serial"
_run_frequencyspecifies how often the widget is run. It takes one of two values:every-framebatch.
_run_modespecifies how the widget code is run. It takes one of two values:serialparallel.
By default, all Widgets run every frame serially (due to defaults above) unless the above attributes are customized.
Both these attributes can be configured independent of each other. Which run method(s) in the Widget class gets invoked depend on both these attributes as described in the following sections.
These available run methods are:
Note
One of run_every_frame() or
run_batch() must be implemented by
the Widget class.
A Widget can make the _run_frequency and _run_mode attributes dynamically
changeable at runtime as well by making them as Inputs.
_run_frequency
This attribute specifies how often the widget is run.
When _run_frequency is every-frame, a method is invoked for every frame of the
trajectory iteration.
When _run_frequency is batch, a method is invoked when a new batch of timesteps
is full. A global “Buffer / batch size” under “Settings > Universe Configuration” in the
dashboard controls the size of this timesteps buffer.
The method that is invoked depends on the _run_mode.
If the _run_mode is parallel, see the next section to see what gets invoked.
If the _run_mode is serial:
and
_run_frequencyisevery-frame,run_every_frame()method is invoked.and
_run_frequencyisbatch,run_batch()method is invoked.
_run_mode
This attribute specifies how the widget analysis code is run.
If the _run_mode is parallel for a given widget instance, a
get_parallel_job() method is invoked to
retrieve the parallel job (a joblib.delayed tuple). A global “Parallel Jobs” under
“Settings > Dashboard Configuration” in the dasboard controls the total number of jobs
run in parallel during each iteration (n_jobs param for joblib.Parallel call).
If a widget has _run_mode as parallel, after the parallel job is completed, a
apply_parallel_results() method is invoked
where the results from the parallel job are passed back to the instance. The instance can
apply the results back to its data structures (like updating it’s values deque etc).
If a widget has _run_mode as serial, one of the methods described in the previous
section are invoked.
Lifecycle methods
There are several lifecycle methods that Widgets can implement (handlers) and these get invoked by the dashboard framework at those stages.
All the lifecycle methods are optional and the Widget class can choose to implement them as they see fit.
Inputs
Widgets can specify certain instance variables as inputs. These inputs show up in the dashboard UI allowing users to configure and modify them at runtime.
An array of inputs is specified using the _inputs class attribute. Each item of this
array is a dict that has at minimum the following keys:
attributeThe attribute that will be get / set
nameThe name to display in the UI for this input
descriptionAn optional description to display as hint for the input in the UI
typeThe type of the input. The following types are supported:
str- A text inputint- An integer number inputfloat- A decimal number inputbool- A switch inputselect- A select dropdown with optionstoggle- A binary toggle between two optionscell- A Notebook cell
Here is an example that creates a string input for the selection attribute:
{
    "attribute": "selection",
    "name": "Selection",
    "description": "MDAnalysis selection phrase",
    "type": "str",
},
Some of the input types take additonal keys as shown in the examples below:
A select dropdown with options:
{
    "attribute": "physical_property",
    "name": "Physical property",
    "description": "Physical property to analyze",
    "type": "select",
    "items": [
        "velocity",
        "position",
        "force",
    ],
},
A toggle option:
{
    "attribute": "x_type",
    "name": "X-axis",
    "type": "toggle",
    "options": [
        {"name": "Time", "value": "time"},
        {"name": "Step", "value": "step"},
    ],
},
The custom_code Widget uses the cell input type as
shown below:
{
    "attribute": "setup_code",
    "name": "Setup code",
    "description": "This code will run once during widget creation",
    "type": "cell",
},
Here is an example of how the different inputs show up in the UI based on their type:
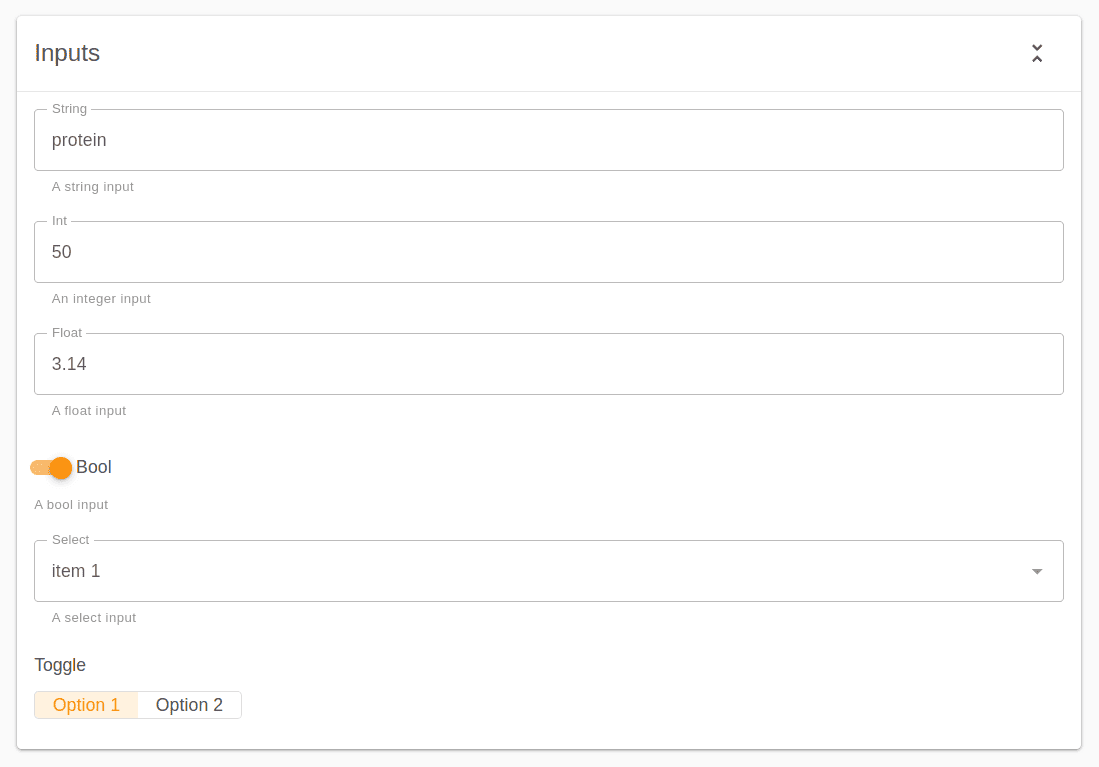
The on_input_change() handler gets invoked
for any input change made from the dasboard UI. Any validation errors raised by the
handler will show up as errors in the UI as well.
Having inputs for the Widget is optional and the Widget class can choose to add them as they see fit.
Caution
Widgets will not be run as long as there are input errors as shown in the dasboard UI. Users will need to fix the inputs after which they will automatically run as configured.
Utils
The following utils are available for Widgets to create alerts and pause the simulation if required when any custom conditions are met in their code.
Notes and Docs link
Widget classes can add an optional _notes string attibute that will display the given
string as Notes in the Widget details page as shown below:
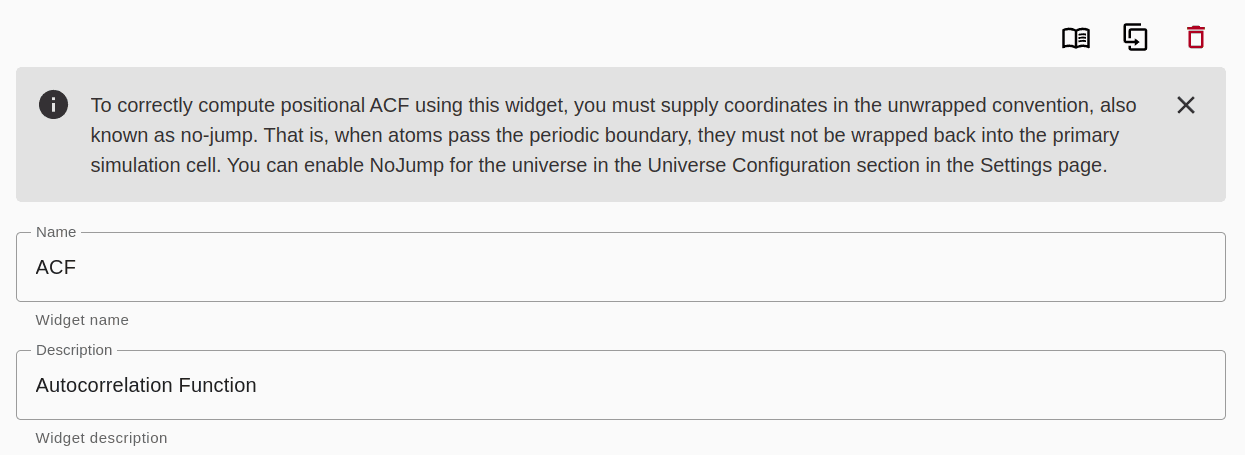
An optional _doclink string attribute can be provided with a link to the Widget class
documentation and if present, it will be available as a button in the Widget details page
as shown above (book icon).
Automatic refresh
All existing instances of a given Widget are automatically refreshed (re-created) when that Widget class gets updated (typically through a Notebook cell execution in the dashboard). All existing inputs are retained as is. This allows updates to the Widget class code reflect immediately in existing Widget outputs.
Examples
Here is a simple Widget that has a single input made available in the UI to customize the MDAnalysis selection phrase and displays the center-of-mass of that selection every frame:
from mdadash.backend.widgets.base import WidgetBase

class CustomWidget(WidgetBase):
    name = "Custom Widget"
    _override_name = True

    _inputs = [
        {
            "attribute": "selection",
            "name": "Selection",
            "description": "MDAnalysis selection phrase",
            "type": "str",
        },
    ]

    def __init__(self):
        super().__init__()
        self.selection = "protein"

    def run_every_frame(self):
        com = self.u.select_atoms(self.selection).center_of_mass()
        print(f"COM of {self.selection} is ", com)
The _override_name attribute set to True is added in the class above to make any
code changes to the above class update in real-time.
Here is an example of how this Widget shows up in the UI along with its output:
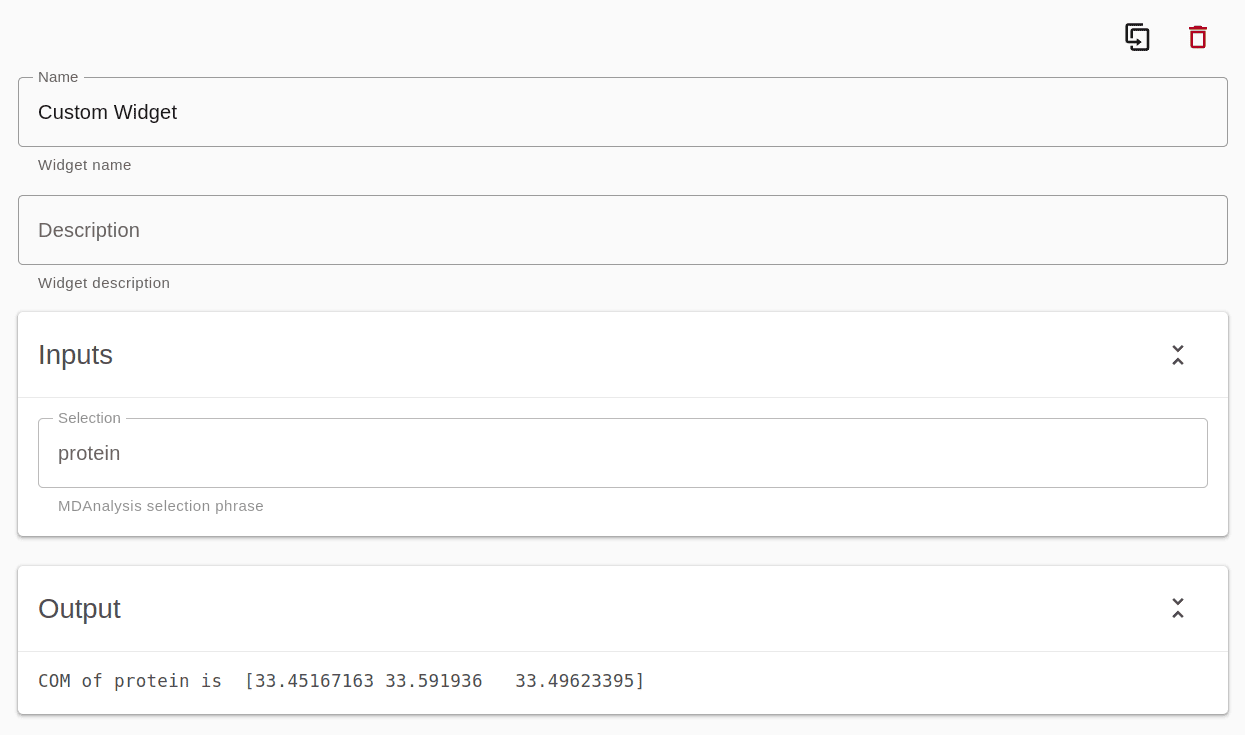
All the Built-in Analysis Widgets use the exact same framework described here and the sources for these are examples of more complex use cases.
Tip
Custom Code built-in Widget provides a
quick way to run simpler custom code.
Built-in Analysis Widgets can also be cloned into new Notebooks in the dasboard UI and customized as described in this document.
If you are adding a custom Widget that could be useful for others in the community, you can create a pull request to make it part of the Built-in Analysis Widgets.